What is DRSABCD?
When emergency strikes, the only way you are going to be able to respond quickly and effectively is if you have CPR training and a predetermined plan of action to jump straight into.
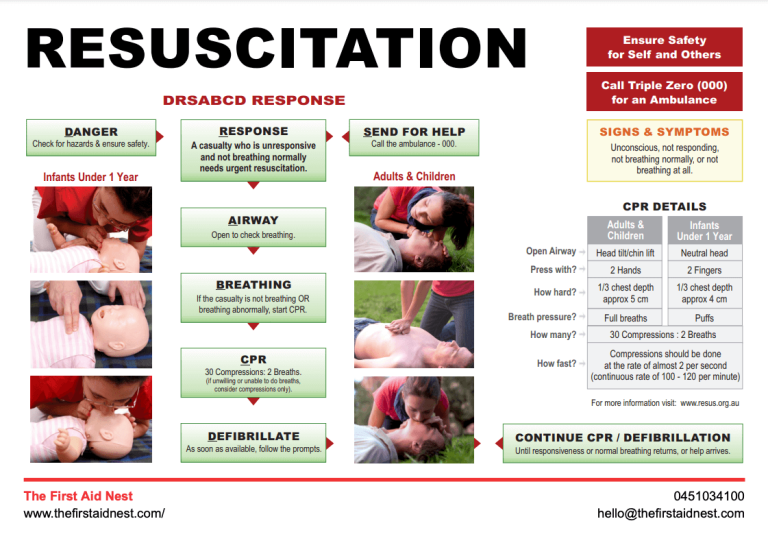
So luckily, there is a clear action plan for us all to follow for a critically ill patient, called DRSABCD – easy to remember right!
Download your DRSABCD poster above.
DRSABCD is an acronym for:
D – Danger
R – Response
S – Send for help
A – Airway
B – Breathing
C – CPR
D – Defibrillation
Exactly what to do in emergency situations
The DRSABCD action plan is as follows:
Danger: Around the casualty, is there any imminent danger to you. If the casualty has their hand on a live electrical wire or in the path of oncoming traffic, it may not be the most helpful thing for you to rush in and try to help them, then end up in the same predicament. If it is safe to do so, you can remove them from the danger of oncoming traffic depending on the situation. If there is a query about neck or back injuries, it may not be the best course of action. If the patient is holding a wire, turn off any electrical current before helping the casualty.
Other potential hazards in emergency situations to consider could be:
- Machinery malfunction
- confined spaces
- chemical spills
making the ‘D’ in DRSABCD the most important starting point in a first aid emergency.
Response: Once it is safe to do so, see if you can get a response from the casualty. Gently hold their shoulders, give them a gentle shake and call their name. Ask them if they can hear you. If they open their eyes and respond to you, this is where the casualty may be rolled into the recovery position if appropriate. Preferably on their left side as this will help the blood pressure. If there is no response, then go to the next step – Send for help.
Send for Help: If there is another person present, ask them to assist you and direct them to call the emergency services, or do this yourself. If you are in a public setting, single out someone specifically to call the emergency services, for example – “you with the yellow jacket – call an ambulance”. This ensures that the bystanders don’t just assume that you or someone else has done this important step in a medical emergency.
Airway: Now we need to check the airway. Open the mouth by performing a head tilt and chin life and check for any foreign objects. If there is nothing to see, leave them on their back and tilt their head back slightly into the ‘sniffing’ position. If this is an infant, the head must be in a neutral position, not tilted back. If there is foreign matter in the mouth, place the casualty in the recovery position with the mouth slightly down so that anything in the mouth can be drained. If you can see foreign matter clearly visible near the front/middle of the mouth, you may be able to remove it with your fingers. Never blindly sweep your fingers towards the back of the throat.

Do you have to administer rescue breaths in an emergency situation?
Breathing: Check for breathing. This is where we use LOOK – LISTEN – FEEL. First, make ake sure you have performed the head tilt and chin lift. Lower your head down so that your cheek is next to the casualty’s mouth, looking down toward their toes. Can you see any chest rise? Can you feel their breath on your cheek? Can you hear any sounds of normal breathing? An occasional gasp is not ‘normal breathing’.
If the casualty is not breathing normally and not responding to you, we presume cardiac arrest and start CPR. If they are breathing, put them in the recovery position if appropriate and await the emergency services. Keeping the airway clear is always the priority so that the casualty can maintain breathing. You might need to place them in the recovery position, but spinal injury is always a possibility if they were involved in an accident. There are techniques for placing an injured person on their side so that there spine is mobilised as little as possible. These are the kind of skills you learn in a first aid course.
CPR: If the casualty is unconscious and not breathing, Start CPR or cardiopulmonary resuscitation. Place both hands, one on top of the other in the centre of the chest, between the nipples. Push down firmly, in a short and sharp manner around ⅓ of the depth of the chest, 30 times at a rate of 2 per second. The ratio for CPR is 30 compressions to 2 rescue breaths.
After giving 30 chest compressions, tilt the victims head back slightly, pinch their nose shut and give 2 rescue breaths making sure you have a good seal around their mouth – lasting around 1 second each.
Continue cardiopulmonary resuscitation in the form of the rescue breaths and chest compressions until help arrives or they person recovers.
CPR for infants is different in life threatening conditions, you would learn this in a first aid course. Place two fingers in the middle of the chest between the nipples, and press firmly in the same ratio and depth, ⅓ of their chest and 2 compressions per second. We still maintain the 30 compressions to 2 breaths but for an infant, the contents of your cheeks is enough for a breath. For a very small baby you may be able to fit your mouth around their mouth and nose.
For performing cardiopulmonary resuscitation on a child, use one hand for the chest compressions, always trying to maintain the compression at ⅓ of the depth of the chest. Again maintaining the 30 chest compressions to 2 breaths. This is instructed by The Australian Resuscitation Council.

Defibrillation: If a defibrillator device is available, apply this to the victim as soon as possible and follow the prompts.
The relationship between a first aid and DRSABCD is a match made in heaven. A first aid emergency situation is one of the most stressful situations imaginable, so having a concrete plan of action like DRSABCD acronym is a welcome tool.
Rescue breaths in emergency situations
When attempting rescue breaths, a face mask can be used. These are available from most pharmacies. This keeps you and the casualty safer from potentially infectious bodily fluid and potential vomiting from the victim.
The ANZCOR guidelines state that rescue breaths should be administered if the person is qualified and confident to do so, but if you are not willing or able to administer the 2 rescue breaths, you should continue with non-stop chest compressions at a rate of 2 per second. (or 100-120 per minute, but we think 2 per second is easier to remember)
DRSABCD in nursing or in a medical facility is slightly different because we are in a hospital environment.
Do you need to update your CPR Training?
Giving first aid in a situation where someone is not breathing is extremely confronting, but the situation can be made much easier and less stressful with the use of this acronym and doing your best. Are you up to date with your first aid and CPR course?
Take a look at our group workplace classes today and book your group in or send us a message to find out more about our first aid training courses.